
Primary Settings of the Anycubic I3 Mega Cura 3D Printer
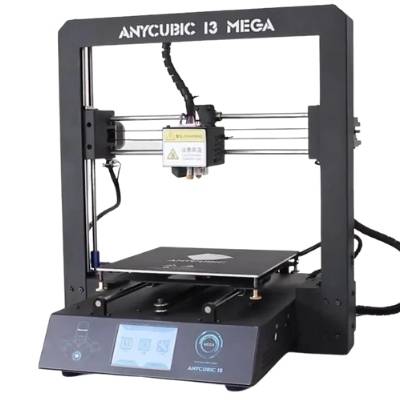
There are several settings that affect the general functions of your printer. These settings determine the overall structure of your model. They are the specifications that let the printer know exactly how to go about building your model. Adjusting these settings will affect the structural strength and appearance of your model as well as the overall print time.
- Print Speed: Time vs. Quality
It is easy to understand that the speed at which your design prints affects how long the entire process takes. What may be less obvious is that it can also affect the intricacy of details as well as how smooth and neat the model prints. All3DP compares printing speed to handwriting. A quick print can work when details and a refined look aren’t of concern just as a scribble does the trick for arbitrary notes. A beautiful hand-written letter, however, requires slowing down and spending time on each letter just as a slower printer setting will create neater layers and allow time for fine detail work.
- Thick vs. Thin Layer Height
Similar to print speed, layer height also affects both the resolution and the printing time of your model. A lower layer height is ideal for greater detail and a smoother appearance, but printing many smaller layers does take more time. Increase the layer height for bulkier pieces and those that don’t need to appear as refined.
Remember that the adjustments do not have to be made in full decimals increments. The standard setting begins at a layer height of 0.2 mm. When decreasing the layer height, you could set it to 0.15 rather than straight 0.1, as an example, to avoid automatically doubling your print time. Also try increasing the thickness of your initial layer for better plate adhesion.
- Infill Density for Structural Stability
3D printers create an outer shell and then fill the space within that shell to the desired percentage. The infill density of your model affects its structural strength and rigidity as well as the weight and the print time. The standard setting of 20% infill is a great starting point for most non-functional models. However, functional pieces, meaning those that may have to support weight or resist other strains of use would be made stronger with a higher infill percentage.
- Hot End Temperature Based on Filament Type
The ideal hot end temperature can be slightly more complicated to determine than the previous settings because it is dependent on the type of filament used as well as the specific brand. Some filament also includes reinforcements that will require additional adjustments. Carbon fiber reinforcements, for example, will require you to increase the hot end temperature more than the same filament without this reinforcement. Always read the tag on filament spools before use for the suggested ideal hot end temperature.
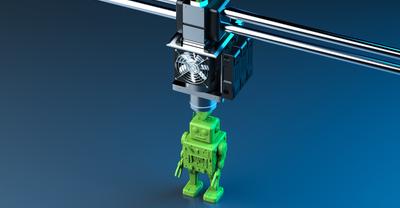
- Adjust Cooling According to Project Size
The Anycubic I3 Mega Cura 3D Printer comes with a fan to cool down your model as it is printing. The standard settings begin with reduced cooling for the initial layers and increased cooling thereafter, an ideal setting for most prints. However, the strength of the fan is quite powerful and it is unlikely that you will need it to run at 100%, particularly when printing smaller pieces.
Advanced Adjustments to Improve Print Quality and Overall Usability
It is a good idea to run frequent test prints to monitor each adjustment as you make it. Once you understand your general settings and have adjusted them to your liking, begin looking at anything that isn’t working or could be improved in the print. Common problems include the following:
- Stringing
- Long printing times
- Shifting and warping of the model due to a lack of adhesion to the bed
There are many factors that can affect your print and it is common to have to perform a number of test prints after each adjustment to find your ideal settings per design. There is no need to worry if all of your primary settings are set to your desired parameters and your model is still not printing to your desired quality. There are a number of adjustments that can be made to clean up your print and to get you the most ideal user experience possible.
- Avoiding Unwanted Stringing
Stringing occurs when the printer moves across space where there should be no structure before the filament has a chance to retract. The Anycubic I3 Mega Cura allows you to adjust the retraction of filament in two different settings. The retraction distance determines how much filament, by length, will be retracted. The retraction speed, on the other hand, affects how quickly the filament is pulled back into the extruder.
The standard settings include a retraction speed of 60mm/s and a distance of 5mm. If your model shows stringing, play with increasing both the speed and distance.
The Anycubic I3 Mega Cura 3D Printer also includes travel settings that help you reduce stringing. Combing is a setting that keeps your print nozzle within the parameters of your print. This may often increase print time because the nozzle’s route is restricted but may be a worthwhile option with persistent stringing issues.
- How to Save on Printing Time
3D printing can be quite time consuming. After all, you’re building creations from scratch right before your eyes! However, although we have discussed how to save on print time in many of our basic settings, there are several other adjustments that can make your printing method more time efficient.
Printing Multiple Pieces at Once
Understanding how to reduce stringing allows you to print multiple individual pieces on one platform. What some don’t realize though is that there are various ways of going about such a print. The default option is to simultaneously print all of the objects from the bed up.
This printing method, however, is not ideal unless you are certain that all of your settings and variables are exactly where you need them to be. By printing all of the objects at once, any flaw in the settings will be a flaw in all of the pieces. Luckily the Anycubic I3 Mega Cura 3D Printer includes a way to adjust this for a more efficient and error-proof print through the Print Sequence option.
This setting tells your printer that instead of building all of the objects at once, it can build one piece in its entirety, then the next and the next until completion. Some of the advantages to this printing method include the following:
An error in your configurations will only affect one model rather than all of them, in turn saving you time and money spent on materials when things don’t go as planned.
Printing each object individually means that you can remove objects from the printer before the rest are done printing. When set up correctly, this method can speed up your overall production time. Place the pieces that you want access to first on the outside of the bed so that they can be carefully detached while the inner pieces continue to print.
With just a few tips and tricks it becomes easy to master the idea print sequence and to go about your print in the most efficient manner possible.
Adjusting Individual Shell Layers
Another way to fine-tune your efficiency and to reduce your print time is by adjusting the thickness of the shell layers. This is possible because the shell is made from three separate layers using a standard thickness of 1.2mm.
The Anycubic I3 Mega Cura 3D Printer allows you to adjust the outer and inner layers separately, which is a nice feature to have when trying to speed up your print time. Because the outer layer is the only shell layer that is exposed, it is best to keep a slower speed on this layer to capture as much detail and polish as possible. Detail doesn’t usually matter on the other two non-exposed shell layers though, so the print speed can be increased on these to decrease the overall print time.
Keep in mind that more rigid structures need thicker shells to allow them to hold the weight and to brace the necessary infill. Safety and stability should never be compromised for shorter print times when it comes to printing functional objects.
- Ensuring Proper Bed Adhesion
Models may shift during printing if they do not properly adhere to the printer bed, resulting in mismatched layers and a sloppy look and structure. Learning how to create a firm adhesion will allow you to create strong and clean prints.
The first thing to do when dealing with bed adhesion issues is to ensure that your bed is leveled properly. If you have gone through this process and you are still experiencing warping in your model, you can also raise the temperature of the bed. Doing so will keep the lower layers heated to remain at a temperature that is closer to that of the newly produced layers than it would be if it were to cool naturally. This reduction in temperature difference between the layers reduces stresses between the layers to help prevent overall warping.
The standard temperature setting on Anycubic I3 Mega Cura 3D Printer bed is 50°C. Although no settings and adjustments work the same for all printers and situations, an increase of 10°C should be sufficient in resolving any warping issues due to improper bed adhesion.
Adjusting the thickness and size of the initial layer can also help with the model’s bed adhesion. A larger surface area will allow more of the plastic to “stick” to the bed, also referred to as wetting the bed. Models without much surface area on their initial layer can be built onto a platform known as a raft to increase the surface area. Be sure to pay attention to separation distance setting to ensure that the raft will be effective and printed as cleanly as possible while still allowing you to easily separate your object from the raft upon completion.
Brims are similar to rafts and can also be used to aid with bed adhesion and warping issues. Brims differ in that they do not go under the model itself, but rather just around it, saving on materials and print time and making it even easier to remove the model from the base.
Choosing Your Filament
Using the right type of filament for your project can affect the end results just as much as any printer settings. While some are soft and flexible, others are rigid and durable. Understanding the different types of filament available is not only crucial for a successful end result, but will also broaden your horizons on all of the many wonderful things you could make with your Anycubic I3 Mega Cura 3D Printer. The most commonly used filaments include the following:
- PLA is one of the most used filaments due to its ease of use. It requires relatively low temperatures, does not tend to warp easily, and remains largely odorless during printing. It is also biodegradable and comes in a large variety of styles and colors.
- ABS is a better-quality filament than PLA, but is somewhat more difficult to work with. It offers high durability and tolerance to high temperatures but is prone to warping and may give off hazardous fumes while printing.
- PETG/PET/PETT are variations of Polyethylene terephthalate, the plastic that is used in plastic bottles. While these bottles utilize “raw” PET, the variation PETG is more commonly used in 3D printing.
- TPE/TPU/TPC are variations of thermoplastic elastomers, a variety of plastics that imitate the qualities of rubber. This is an extremely durable type of filament, but its rubber quality also makes it a difficult filament to extrude when printing. TPU is a variation that is slightly more rigid and thus better suited to be used with a 3D printer nozzle.
- Nylon is strong and flexible and, as a result, one of the most durable types of filaments commonly used in 3D printing, making it a great choice to create functional tools with. This type of filament can also be a fun choice for those creative types who want the ability to dye their filament rather than choosing a predetermined color.
- Polycarbon (PC) is an extremely durable filament that is also tolerant of temperatures as high as 110°C. Its durable qualities combined with its transparent nature makes polycarbon a great material for anything from mechanical or electronic parts to light boxes and display cases.
While these are the most common types of filament and most come in a variety of colors and styles, there are some other common filaments that took style and design to another level. Some more unique types of filament include the following:
- Wood, clay, and metal filaments are PLA filaments respectively infused with wood shavings, clay powder and metal powder. Each comes in a nice variety of styles and bring a natural and earthy essence to your projects.
- Biodegradable filaments have made a mark on the market, an amazing route to go particularly with the large amount of waste that can often occur in 3D printing.
- Conductive filament uses carbon particles to conduct electricity, making it a great choice for electronics projects.
- Glow-in-the-dark filament is PLA mixed with phosphorescent materials so that you can make all of the glow-in-the-dark ornaments and wearables to your heart’s desire.
- Magnetic filament is PLA and ABS mixed with powdered iron, creating a filament that does not have its own magnetic field, but will be drawn to other magnetic fields.
- Color-changing filament changes according to temperature and is another fun filament type to create all kinds of decorative items and wearables.
In Summary
There is a lot to learn when first starting in the world of 3D printing. From the basic mechanics of your printer to the many adjustable settings and filament types, this guide serves as only an introduction to the world of options and possibilities a 3D printer provides. Although 3D printing may at times feel overwhelming, remember that simply adjusting and trying out your variables at different settings is the best way to become a 3D printing pro.